Overview
This was my first independent robotics project. After I finished the delta robot, I felt confident enough to create something from scratch instead of following instructions. I was very hyped and I thought a robot car wouldn’t be much different than a delta robot. Motors, electronics, software the same, the main difference is simply that a car has a chassis instead of a frame…
Basic design
I made a shopping list: chassis, motors, wheels, electronics, … As these are mostly dependent parts, without any experience, I was afraid of buying parts that may not work together. It looked a better idea to buy first the most fundamental part of a car, the chassis, and, make better-informed decisions on the remaining parts with that in my hand.
I went on the internet to look up robot chassis, and I found this immediately:
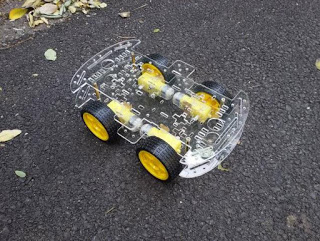
I loved it as it was very cheap (< 10$ that time) and included the motors and wheels. Its quality was questionable (judging by the price), but being inexperienced, I did not have any expectations either. It seemed a good idea to learn what really matters in a robot, for such a small price.
When I finally received it, it was immediately clear that there is not much space for the electronics. By the picture, I thought that some stuff can be put on the undercarriage, but actually the motors used up most of the space there.
As for the electronics, I needed at least a microcontroller, motor drivers (I learnt this from the delta robot) and something to control the robot (bluetooth?), not speaking about the battery holder. For various reasons I already had an Arduino Mega and an Arduino Nano at home; to limit the cost, it seemed reasonable to use one of them.
I considered the pros and cons. The Mega is quite big (-1), but can be used with a motor shield, so the motor drivers do not use additional space (+1) + it has many IO pins (+1). The Nano, however, very tiny (+1), but shields cannot be placed on it (-1). It also has a way less IO pins (-1). The Mega looked a clear winner. On the other hand, motor shields are quite expensive, and I do not need too many IO pins for my simple robot. Not speaking about, how cute the Nano is… Thus, I ended up using the Nano and two small sized, very cheap L298N based dual motor drivers. It was powered by 4 AA batteries.
Controller
During the development, the robot was controlled via the Nano’s USB serial interface. For the final version, however, I wanted something wireless. My first candidates were bluetooth, xbee and wifi. All of these have cheap receivers, in addition, bluetooth and wifi are very ubiquitous, any mobile phone can be used as a client (xbee does not have this advantage, so I ruled it out instantly). Compared to bluetooth, wifi is not very practical either as it needs a network (bluetooth can connect to another device directly).

However, bluetooth has a big disadvantage regarding kid friendliness: it cannot be used without a e.g. mobile phone, what my 6 years old kids certainly do not have (a second disadvantage is that it requires some client software to be developed). So I kept looking. I wanted something that has an easy-to-use remote controller like thingy, e.g. a 2.4ghz RC transmitter used for remote controlled helicopters (however it would be hunting rabbits with an elephant gun, and a way to expensive). I found an infrared remote controller, incredibly cheap, but it is not quite user friendly and I was afraid it may have connection problems (that would have certainly spoiled the fun of the kids). I was thinking that something like a play station remote controller would be great… why not actually? I checked it, and turned out that it is available for Arduino and inexpensive. Just perfect.
Additional parts
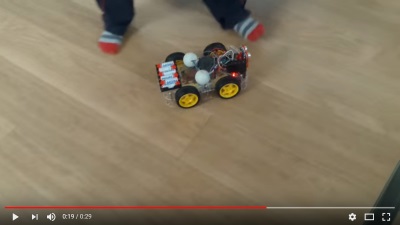
If something is built for kids, the basic functionality is certainly not enough. The first three requests were the following: eyes, siren, lights (I’m not sure in the order though). For the eyes, I mixed business with pleasure: the ubiquitous HC-SR04 ultrasonic sensor made the robot very cute (3D print a mount, many model available for free). The siren was the easiest, it turned out that a small speaker or piezo buzzer can be directly controlled by an Arduino. Finally the lights. Of course, lights meant something that police cars have, not an ordinary headlight. After contemplating on this task a bit, I ended up mounting RGB leds into ping pong balls. The kids loved it.
Software
There are many tutorials available online on how to program the individual parts, but the integration of the software components may not be entirely straightforward. The main problem is that many tasks should run (semi) parallel, e.g. reading the controller / the ultrasonic sensor, changing the tone played by the speaker / the color and intensity of the lights, controlling the speed of the motors. On normal processors, the common technique is to utilize threads; they give the feeling of real concurrency even on a single processor. But for threads, one needs an advanced microprocessor, and a scheduler (that is usually part of an operating system). On a microcontroller, these features are not available. One can use green threads though: they emulate multithreading without relying on any processor support. On Arduino, e.g. the mthread library can be used for this purpose.
The firmware of my robot is available at github. It probably cannot be applied directly to any projects, but it may be a good source of code snippets and ideas.
List of parts and cost
Just to give a basic idea how much such a project cost (not much). I provide the “Chinese” price based on a simple search at aliexpress at the time of writing the post. Unfortunately the prices are increasing, it is already more that I used to pay a few months ago (especially the chassis), some sellers are getting greedy there…
You may need some common things that are not listed here, e.g. jumper wires and tools, but it is not bad at the end at all. Especially considering how much it may inspire the kids to work on their own inventions.
| Part | Price |
|---|---|
| Arduino Nano | < 2$ |
| L298N x 2 | < 2$ x 2 |
| Chassis + motors + wheels | ~ 20$ |
| PS2 controller + receiver | ~ 15$ |
| Piezo buzzer | < 1$ |
| RGB led x 2 | < 1$ x 2 |
| HC-SR04 | < 1$ |
| < 46$ |
Problems (and future work)
-
Power distribution: I already wrote about it here. Serious problem that could be alleviated by replacing the 4 AA battery holder with a 6 AA one. This is only a temporary solution though, for the second version of the robot, I certainly want to use proper batteries.
-
Chassis: It is a very impractical chassis. a) There is no much room on the undercarriage, so most parts had to be installed on the top where space is also limited. b) Because the electronics was not safely concealed in the chassis, it is extremely not kid friendly. Can you imagine how much your kids has to resist the temptation of tampering with the myriad of jumper cables? c) Mounting holes, how made you? None of them fitted any of the holes on my electronics. Furthermore, because it is made of acrylic, you cannot make new holes without risking of a crack. Acrylic is just not practical for prototyping. d) Acrylic is not kid friendly, very fragile. This robot lived for a week only.
-
Microcontroller: using the Arduino Nano was a poor decision. I actually ran out of IO pins in no time, especially the PWM ones. A second problem was quite unexpected, it occurred because of the number of available timers on the chip. The Nano has 3 timers, one of them is used by delay() and millis() functions, so only two of them are free. However, I needed timers for playing music, controlling the ultrasonic sensor and providing a clock signal for the PS2 receiver. It was a heroic struggle to support all of these. In contrast, the Mega has 6 timers…
-
Wiring: I need to find a way to make wiring nicer, at first I thought it was cute with the many jumper cables going all over, but it was actually just a messy hack what rendered the robot extremely unreliable.
-
Kinder friendliness: The kids wanted to use the robot in their own creative way e.g. installing their own LEGO creations on the top, attaching additional cars to the chassis and so on. With this robot it was just not possible; the next version must be designed to fulfill these expectations.