Overview
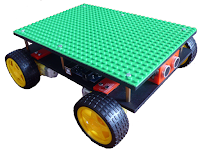
The first version of my robot car went broken in no time, the acrylic chassis was a way to fragile for my kids. Fortunately, all the other parts survived, only the acrylic parts were needed to be replaced. There also had to be found a way of mounting the motors. This time I wanted a more kid friendly design, at least the electronics should have been hidden in the chassis, but something that was also a LEGO platform was preferred. I came up with the simplest possible design, an undercarriage and a cover with the electronics in-between, and a LEGO baseplate fastened to the top of the cover board.
I listed over the material alternatives. The candidates had to be inexpensive, easy to work with, stiff and light. In this order; I was afraid it was already too much to ask for…
- Aluminium: That would be lovely, but also a way too expensive, especially for prototyping purposes.
- Acrylic: Not for me. It is just too rigid, and hard to work with (although it is one of the cheapest option); I did not want to risk a crack every time when a new hole needed to be drilled (it is a completely different case, though, if you can plan ahead and laser cut all the necessarily holes).
- Plastic: HDPE is one of the most commonly used plastic materials in robotics. I was just not sure whether it is stiff enough for such a wide chassis I wanted.
- Wood: I filtered it out in the first place as being too low-tech, but otherwise it fulfilled all the requirements. Then I learnt how cheap it is; since that I believe the marriage of low-tech and high-tech is actually an interesting idea…
If opting for wood, basically there are two options, plywood and MDF. Plywood is many thin sheets of wood glued together, while MDF is basically sawdust and glue, fused together under pressure and heat. Personally, I think plywood looks nicer, and also lighter a bit than MDF, but it has an annoying tendency to split among wood grain; without a laser cutter I felt more confident with MDF.
MDF comes in large tables. The smallest one I could buy was 122x61cm, enough for ten robots at least (for the price of an ice cream). The 4mm thick version felt a bit too flexible, but the 5mm thick one seemed alright.
First, I designed an easily 3D printable simple T-shaped motor mount:
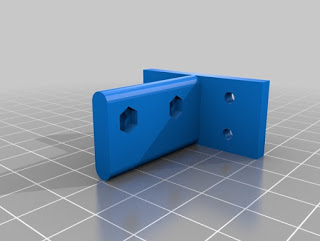
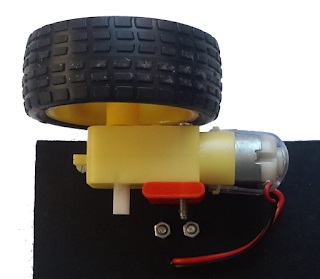
The stem of the T-shape is supposed to be put through an oblong hole cut into the chassis (it was trivial to make with a Dremel). The motor mount then is fastened to the chassis from the top by four M3 screws, while the motor is fixed to the stem of the T-shape by another two long screws.
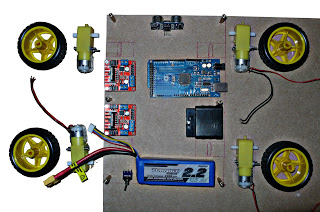
Next, I put the main components of the robot on the MDF board to estimate the necessary size of the chassis. Then I allocated same space for the motor mounts by drawing their contours on the board. Finally, the positions of the components were adjusted taking the motor mounts into account. This method took only a couple of minutes, and the result was quite accurate (with the LEGO board on the top, the positions of the hex spacers also should be chosen carefully, you want the head of the screws to be between the “bumps”).
The most critical part is to cut out the chassis from the board (twice, a second one for the cover). I believe that it is just impossible to make a nice, long, precision cut with a hand saw. Anyway, the result was satisfactory, and actually much better than I expected. I finished it up with polishing the cut edges a bit.
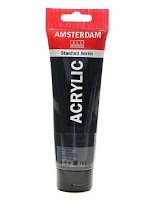
Eventually, the chassis looked really nice, but just as low-tech as I expected. My wife came up with the idea to treat the wood with some high quality acrylic paint. There was some from the Amsterdam brand at home, we used a mini roller to apply it to the chassis as evenly as possible. I was very pleased with the result, it looked really “crafted”.

And the proof that the idea really worked out:
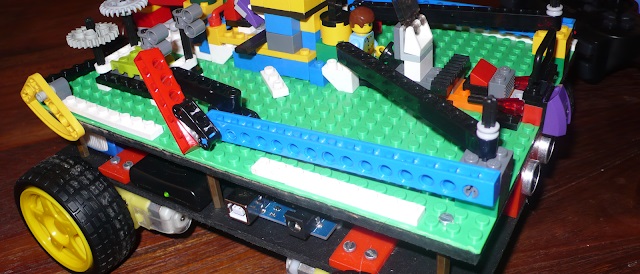
First test, without the cover yet:

Lastly, the list of parts and cost:
| Part | Price |
|---|---|
| MDF board | < 5$ |
| 3D printed motor mount x 4 | - |
| 6cm hex spacer x 6 | ~ 2$ |
| LEGO Building Plate (10” x 10”) | ~ 10$ |
| Amsterdam acrylic paint | ~6$ |
| < 23$ |
What robot car chassis would you use?